This is an old revision of the document!
Table of Contents
Managing large DEMs
Intro
While data can be downloaded in an ad hoc manner, if you are regularly processing DEMs, it is better to have the DEM tiles already downloaded.
Once downloaded, pre-process the tiles into GeoTIFFs, build a virtual raster for each 1:100k grid square. You can then build a virtual raster of virtual rasters!
Downloading data
Download tiles by 1:100k map area, which is 0.5 x 0.5 degree squares. Each 1:100k map area ranges from around 2GB to 6GB of data, depending on the number of 2m DEMs vs 1m DEMs, and other factors.
The Sydney basin and Blue Mountains is around 50GB all up.
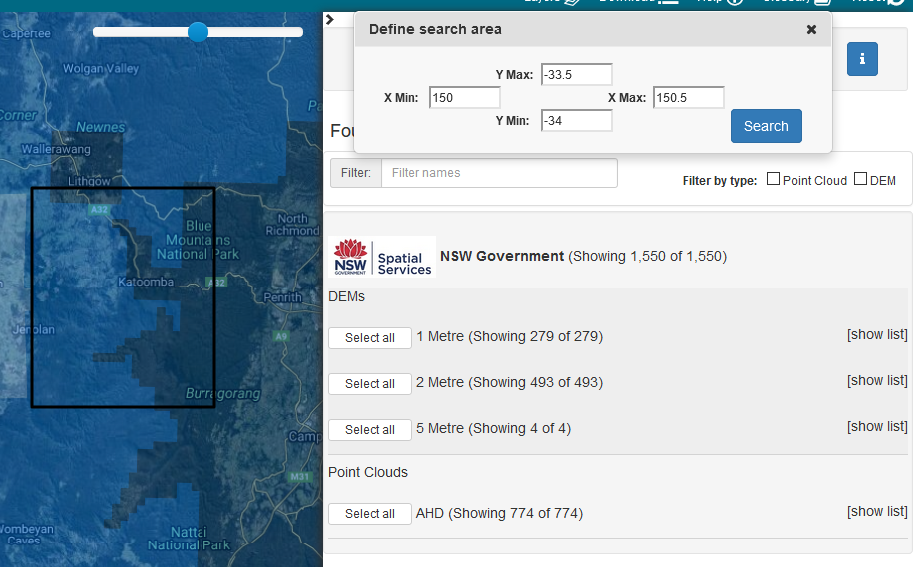
For example, to request data from ELVIS for the Katoomba 1:100k map area (bounded by -33.5,150,-34,150.5), see the screenshot below, and Select All DEMs:
For reference, below are the 1:100k map areas around Sydney:
| 8833_gulgong | 8933_merriwa | 9033_muswellbrook | 9133_camberwell | 9233_dungog | 9333_buladelah | 9433_forster |
| 8832_mudgee | 8932_mt_pomany | 9032_howes_valley | 9132_cessnock | 9232_newcastle | 9332_port_stephens | |
| 8831_bathurst | 8931_wallerawang | 9031_st_albans | 9131_gosford | 9231_lake_macquarie | ||
| 8830_oberon | 8930_katoomba | 9030_penrith | 9130_sydney | |||
| 8829_taralga | 8929_burragorang | 9029_wollongong | 9129_port_hacking | |||
| 8828_goulburn | 8928_moss_vale | 9028_kiama | ||||
| 8827_braidwood | 8927_ulladulla | 9027_jervis_bay |
Pre-processing data
The following may be useful for Windows users.
Below is a Windows Powershell script that will
- move any old DEMs and DEMs from a different zone (you can't mix zones in a virtual raster) to an archive sub-folder
- extract the raw files from the remaining zip files
- convert all of the .ASC files to GeoTIFF
- move the old zip files to a current sub-folder
- zip the current and archive sub-folders to temp.zip
- create a virtual raster (.vrt) file of all of the GeoTiffs
You will need to replace the Environment variables (Path, GDAL_PATH, GDAL_DRIVER_PATH, PROJ_LIB) in the script with your own - see the lines starting with $Env.
Usage is:
.\buildvrt.ps1 <zipFile> <targetFolder>
eg
.\buildvrt.ps1 E:\geodata_raw\DATA_11279.zip E:\geodata\kiama
The .\ is required if you are running the script from your current directory.
- buildvrt.ps1
$zipFile=$args[0]
$targetFolder=$args[1]
You can rename temp.vrt to anything you like, but it needs to stay relative to the GeoTIFF files.
It is possible to then build a larger virtual raster from the individual 1:100k virtual rasters. Note that larger rasters need to have the same projection. Also keep in mind that not all data is at 2m resolution.
Loading data
Loading up a large virtual raster into QGIS can be very slow, as can manipulating it. However, you can quickly load up a smaller section of the map using the following steps:
- create the boundary of your desired area using the polygon tool at https://maps.ozultimate.com/
- download the polygon using the Export drawn data to GeoJSON function
- load up the Python console (Plugins→Python Console or Ctrl+Alt+P on Windows) in QGIS
- run the following command (replace file locations with your own - the INPUT should be your virtual raster, and the MASK should be your GeoJSON boundary polygon)
resultClip = processing.runAndLoadResults("gdal:cliprasterbymasklayer", { 'ALPHA_BAND' : False, 'CROP_TO_CUTLINE' : True, 'DATA_TYPE' : 0, 'EXTRA' : '', 'INPUT' : 'E:/geodata/8930_katoomba/area.vrt', 'KEEP_RESOLUTION' : False, 'MASK' : 'C:/Users/Downloads/data.geojson', 'MULTITHREADING' : False, 'NODATA' : None, 'OPTIONS' : '', 'OUTPUT' : 'TEMPORARY_OUTPUT', 'SET_RESOLUTION' : False, 'SOURCE_CRS' : None, 'TARGET_CRS' : None, 'X_RESOLUTION' : None, 'Y_RESOLUTION' : None })
Multiple projections
If you are trying to process data near zone boundaries, you may run into issues where the tiles are of multiple projections. Virtual rasters run into numerous issues in this scenario. Even if you translate the data from one projection to the other, you will hit issues with pixel sizes, and pixel starting points.
The best approach so far seems to be to
- clip each raster to a modest size
- reproject one file to the other CRS (projection)
- merge the two files, with
- the un-reprojected one first
- the
-tap
flag set
- and possibly the
-ps
flag as well
You can then use this merged raster for operations around the zone boundaries.